How LayerShop works with ComfyUI
For people who want to know what happens under the panel, and for ComfyUI users who want LayerShop to use the setup they already have.
Who does what
LayerShop does not run models itself and contains none. It is the editor: it knows about your document, your selection and your layers. ComfyUI is the engine: it loads model files and runs them on your graphics card. They talk over ComfyUI's ordinary local HTTP interface.
Because the interface is ComfyUI's own, anything that speaks it works: the copy LayerShop installs, ComfyUI Desktop, the portable build, a git checkout, or a server on another machine reached through a tunnel.
The managed engine
If you let the wizard set things up, you get a private ComfyUI with its own Python in LayerShop's folder. You never have to open it.
- It starts when needed. The first local generation starts ComfyUI hidden; the panel shows "Starting ComfyUI…" for about half a minute. Later generations reuse it.
- It stops when you quit. Only a server LayerShop started is ever stopped, on quit or with Stop Server.
- Its output is kept. Everything ComfyUI prints goes to
comfyui.login the settings folder, and a start that fails quotes the last lines.
The switch for this is Preferences › Generative AI › Local Server › Start ComfyUI when a local model needs it and it isn't running.
Using your own ComfyUI
If a ComfyUI already answers at the configured address, LayerShop uses it as it is. Nothing is started, and nothing is stopped later: it is yours.
- Address. The portable build listens on
http://127.0.0.1:8188, ComfyUI Desktop onhttp://127.0.0.1:8000. Set it on the Local Server page and press Connect. - Find Installation fills in the Python, folder and arguments from the ComfyUI that is running now, exactly as it was started, or from the installation ComfyUI Desktop recorded.
- Browse… is for anything else: choose
main.pyandpython.exe. Whichever half sits in a usual place next to the other (.venv,venv,python_embeded) is filled in for you.
ComfyUI Desktop and a server started by LayerShop want the same port. If Desktop will not start, press Stop Server in LayerShop first; it will then use Desktop's server.
Managing models
Preferences › Generative AI › Manage Models is one list of every model, cloud first and then local, in the order the panel shows them.
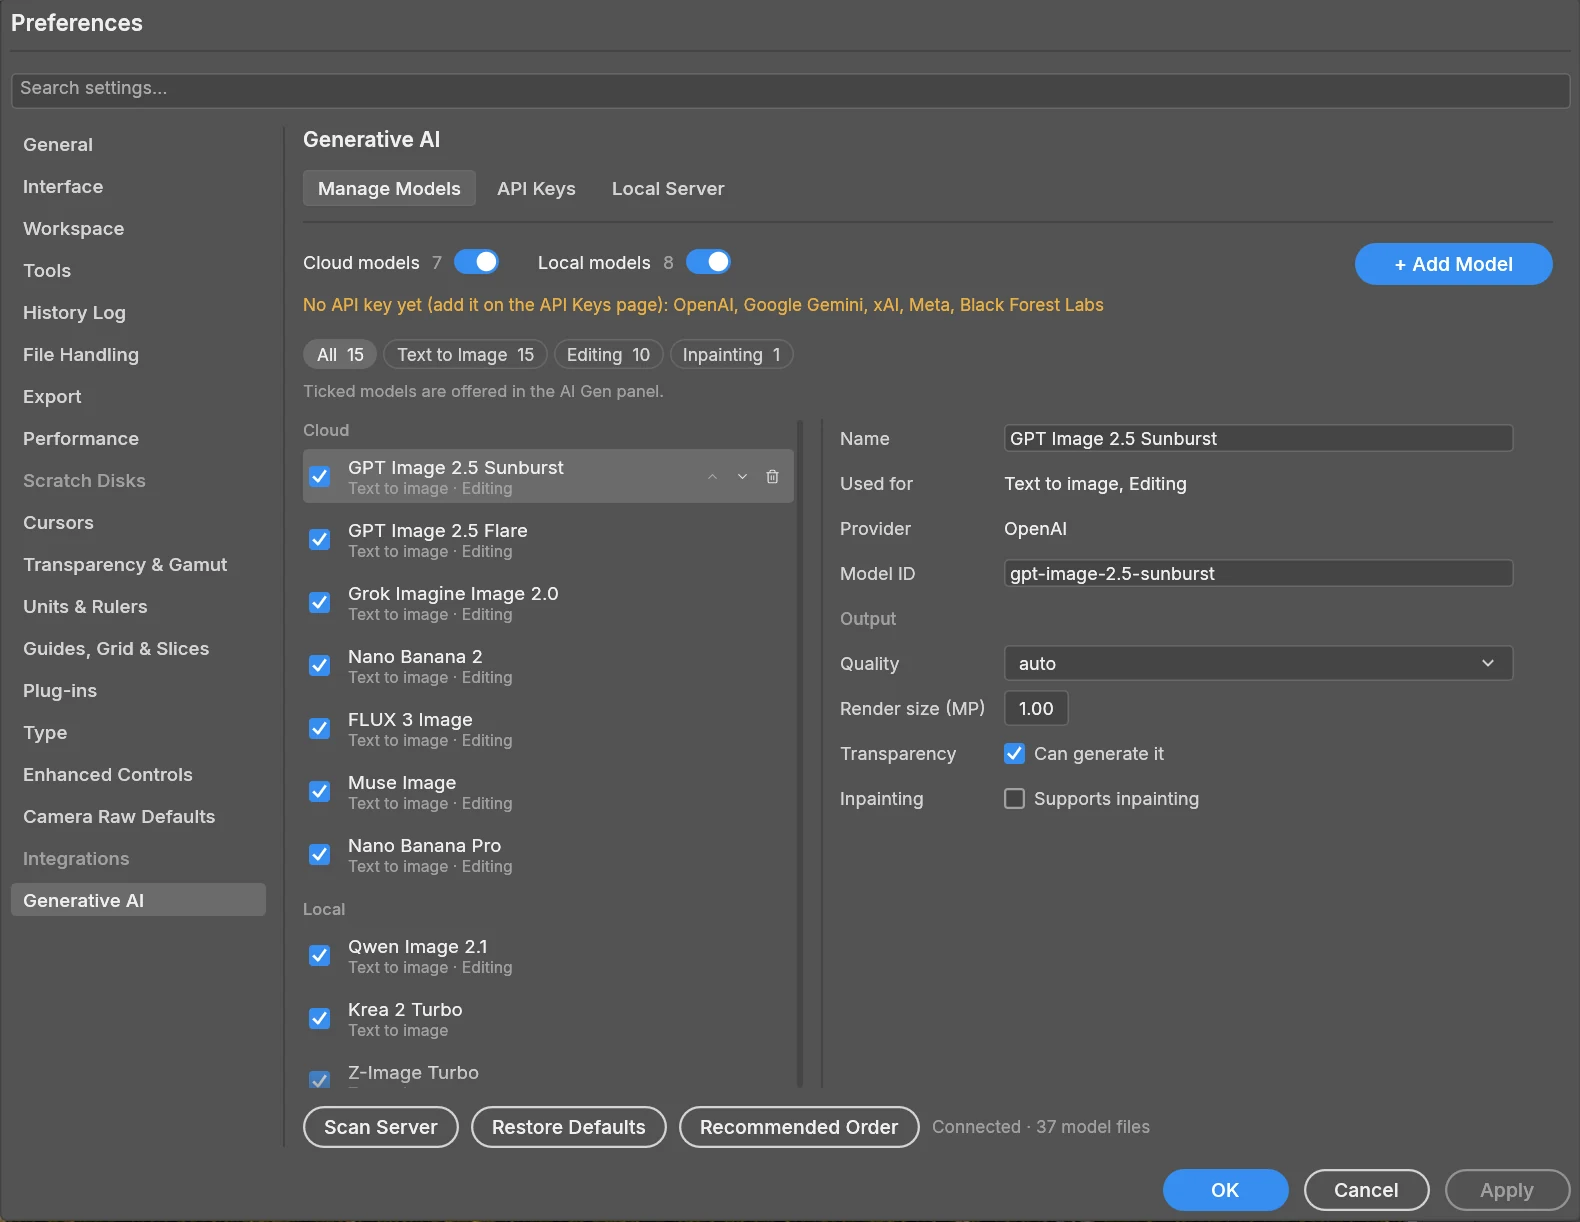
- Scan Server adds a model for every model file your ComfyUI has. If you have a recommended model stored another way (
bf16where the list expectsint8), the listed entry is pointed at your file and keeps its settings. - + Add Model adds a cloud model, a local one by architecture, or one of the models made for inpainting.
- Restore Defaults puts back recommended models that are missing and changes nothing else.
- The switches at the top leave cloud or local models out of the panel without removing them.
- A local model whose file the server does not have is marked, so you know before you press Generate.
Built-in workflows
Each local model has an architecture, and the architecture decides the workflow LayerShop queues. The workflows follow ComfyUI's own templates and use only nodes that ship with ComfyUI, so there are no custom nodes to install and none to break on an update.
| Architecture | Loads | Sampling |
|---|---|---|
| Qwen Image 2.1 | diffusion model, text encoder, its own VAE | its own prompt node, KSampler |
| Z-Image | diffusion model, text encoder, VAE | AuraFlow shift, KSampler |
| FLUX.2 (Klein, Dev) | diffusion model, text encoder, VAE | Flux2Scheduler, CFG guider |
| Krea 2 | diffusion model, text encoder, VAE | KSampler |
| Ideogram 4 | diffusion model and unconditional model, text encoder, VAE | AuraFlow shift, dual-model guider |
| Ming Image | diffusion model, text encoder, its own VAE | FLUX shift by size, guider without CFG |
| HiDream O1 | one checkpoint | noise scale, patch seam smoothing, KSampler |
| Ernie Image | diffusion model, text encoder, VAE | KSampler |
| FLUX.1 Fill inpainting | diffusion model, two text encoders, VAE | Inpaint Model Conditioning, FLUX guidance |
| Qwen Image + InstantX inpainting | diffusion model, text encoder, VAE, ControlNet | ControlNet Inpainting Apply |
| Checkpoint (SD, SDXL) | one checkpoint | KSampler |
| Custom workflow | whatever yours loads | yours |
Per model you can set steps, CFG, sampler, scheduler, shift, guidance, seed, a negative prompt, an optional LoRA and the render size. The defaults are the values each model was tested at.
Custom workflows
For anything the built-in graphs do not cover, such as LoRA stacks, prompt enhancers or custom nodes, use your own workflow. In ComfyUI choose Workflow › Export (API), add a model of the architecture Custom workflow in LayerShop, and paste the JSON. Put these placeholders where the values go:
| Placeholder | Becomes |
|---|---|
%prompt% %negative% | The prompt, and the model's negative prompt |
%width% %height% | The render size worked out from your selection |
%seed% %steps% %cfg% | The model's settings |
%denoise% | The panel's Strength (1 for text to image) |
%image% %mask% | File names of the picture and the mask, uploaded to ComfyUI's input folder |
A field that is exactly a numeric placeholder, such as "%width%", becomes a number. The workflow needs a Save Image or Preview Image node. To fill selections with it, give it two Load Image nodes whose image is %image% and %mask%; the mask file is transparent where to paint, so the second node's MASK output is the mask.
"10": { "class_type": "LoadImage", "inputs": { "image": "%image%" } },
"11": { "class_type": "LoadImage", "inputs": { "image": "%mask%" } },
"6":  { "class_type": "CLIPTextEncode", "inputs": { "text": "%prompt%", "clip": ["4", 1] } },
"3":  { "class_type": "KSampler",
        "inputs": { "seed": "%seed%", "steps": "%steps%", "cfg": "%cfg%",
                    "denoise": "%denoise%", /* … */ } }
Cloud models
Cloud models are optional and sit in the same list. Each provider needs your own key, entered on the API Keys page.
| Provider | Models offered |
|---|---|
| OpenAI | GPT Image 2.5 Sunburst and Flare, GPT Image 2 |
| Nano Banana 2, Nano Banana Pro, Nano Banana 2.1 | |
| xAI | Grok Imagine Image 2.0 |
| Meta | Muse Image |
| Black Forest Labs | FLUX 3 Image, and older FLUX endpoints by id |
- Keys are stored in their own file, apart from the preferences, and a key is only ever sent to its own provider.
- The Model ID is editable, so a newer model of the same API works without waiting for an update.
- Where the provider reports or publishes prices, the panel shows an estimate before you generate and what the last image cost.
Scripting and agents
Everything in LayerShop is a command with an id and JSON parameters, and the AI features are no exception. The panel runs the same commands that are exposed over MCP, so an agent can drive the running editor.
select.rect  { "x": 860, "y": 400, "width": 460, "height": 470, "ellipse": true, "feather": 12 }
ai.generate  { "prompt": "a red deer stag standing in the tall grass",
               "mode": "inpaint", "model": "flux-2-klein-9b" }
→ { "layer": 8, "mode": "inpaint", "renderSize": [1008, 992], "seed": 4242 }
| Command | Does |
|---|---|
ai.generate | Create, fill (inpaint), restyle (img2img) or change by instruction (imgEdit), onto a new layer |
ai.models | The models, what each can do and whether it can run now |
ai.sources | What a restyle or an edit can start from |
ai.mask | Paint the area to change instead of selecting it |
ai.comfyModels | The model files a ComfyUI server has |
ai.server.status | The local server's state |
A generated layer carries its settings under generation, named the way ai.generate names its parameters, so they can be passed straight back. Two things agents cannot do: read API keys, and change how the local server is launched, since that names a program to run.
The demo pictures on this site were made exactly this way, by a script calling these commands. The source is on GitHub.